January 29, 2014

Questions of the Day for Those With More Than One Blog

I have been reading a lot of tutorials on how to have a successful blog, and I've been thinking about a some of the advice. One thing that has spent a lot of time tumbling around my empty head is that most of them advise that a blog should have a specific subject, for example, lampshades. And every post within that blog should be about lampshades. They also suggest that people who have a blog narrowed to one subject should have a separate blog for their other interest(s), for example, naval lint.

Now I like a lot of blogs with a very specific topic, like woodworking, or quilting, or makeovers, but I also don't like a lot of blogs with very specific topics, like lampshades or naval lint. I made those up by the way, I think, though there probably is a blog just about lampshades, and there could very well be a blog about naval lint. But the point is that there are blogs that don't interest me, just as there are blogs that don't interest you. I do find, however, that subject specific blogs are easier (meaning they take less time) to browse because I either like it or I don't.

My favorite blogs are the ones where the author gives a connection to their personal life. I get the warm fuzzies of friendship or a kindred spirit, even though it is one dimensional. I don't expect to ever meet these bloggers, but I know they are real people, with real lives, facing some of the real problems as I. And it makes a difference.

But back to the subject at hand, having more than one blog, and at least one for a specific subject area. Of course, I don't do that here, and it may be too late, or too futile to even consider it. But I do have some questions for those of you who do so I'll have more thoughts to tumble around.

1. Did you start out at the beginning with more than one blog, or did you separate them after a time?

2. Do you have different blogs for different areas of interest or another reason? What is that?

3. Is it harder to come up with content when you have multiple blogs, or do you just post less often to each?

4. Do you find that you have the same readers on each blog, or does each blog attract a different set of readers?

5. Did separating your blogs increase your readership and/or comments on one or more of the blogs?

6. What would you recommend to someone who is just starting a blog? Or to someone who has an long time multi-purpose blog? (that would be me)

Thanks!

Photobucket

January 24, 2014

DIY Planter Box


I needed to build some planters because I had two problems. The first was these rooted cuttings:


The  second was this stack of leftover V-board from our ceiling project:


The plants are Brugmansia cuttings and I needed planters for them. Apparently they need a lot of growing room and a set of purchased planters would cost over $400. Eeek!

So I used the wood I had on hand and built my own using these plans from Popular Mechanics. I won't go into a step by step how-to as they have already done that. I'll just note the changes I made on each step to make the planters fit my needs.

Intro/Materials: On the materials list, I used pine tongue and groove(T&G) instead of cedar. I did it because I need to use up the pine, even though I know it won't last as long as cedar. Also, none of the big box or lumber yards near me stock T&G cedar.

I used pressure treated (PT) pine for the cleats and slats. Big Box does carry one inch cedar, but it's a fence grade and wouldn't begin to hold up the weight of soil in the planter. I used 1-1/4 inch PT decking planks for the slats.

Step 1: Cut planks into 24 inch pieces


And cut 1/2 off each end piece

Step 1: My planks are 5 inch, and I wanted each panel to be 24 inches wide, so out of the 20 plank pieces needed for each planter, I needed to cut 1/2 inch off 8 pieces.  That was actually 1/2 inch off the grooved side of 4 pieces and 3/4 inch off the tongue side of 4 pieces (because the tongue was an extra 1/4 inch).  The Popular Mechanics how-to doesn't say anything about cutting the sides of any of the planks, but I'm sure they did to get the flat cuts on each side.

Step 2: Attach Planks to trim rails.


Step 2: I didn't use glue. I figure the weight of the soil in the planter will hold the planks snug against the trim, and the trim is screwed together well.  I also made my trim rails longer than they did, so that they extended 3/4" on each side of the panel.  I wanted the trim to butt up to each other.  I also made my bottom rail extend past the panel so it would cover my casters, but found out later that didn't work out well.

I found it easiest to put the panels in place over the trim pieces, use a piece of scrap trim to space the 3/4" and shoot one nail in each corner.  Then use a board to tap down all the planks and shoot the rest of them.

Step 3: Attach the cleats


Step 3: I did not offset the cleat, but put it flush with the bottom of my panel. They used the cleat to both hold up the slats and to be the feet of the planter. I wanted my planter to be mobile and needed the cleat to be flush with the panel to have the right size surface to attach the casters.

Step 4: Build the box


Step 4:  I used 2 inch screws, not that it makes any difference. I think they used the longer screws to avoid buying more screws. Since I had all sizes, I used a smaller one for this step.  I also found it easier to put one screw in each end of the rail trim and then square up the top before putting in the other screws.  Then flip it over and do the same with the bottom.   I also counter sunk my screws because I didn't want them showing.  Then I covered the hole with a button plug.

I didn't add the slats at this step either because I still have to turn the planter over to add the casters.

Step 5: Attach the rim.


Step 5:  I wanted a mitered corner, so I cut each piece at 25 inches and cut a 45 degree angle in it.  Then just attached with finish nails.

***********************************

I didn't want the lattice, so this would be the end of their instructions.  However, I'm adding a couple of my own steps here.

Step 6: Attach casters

Step 6:  I used these 2 inch locking casters in the front and non-locking casters in the back, and as you can see I had to put a block under them.  I found that the extended bottom rail trim interfered with the swivel so had to use the block.  That's why I should have done it like they did.  The caster is set back enough that the ugly part isn't really visible.

These are the casters I used but I'm not really happy with them.  They're hard to lock.
Step 7:  Bottom slats

Drill bits used to make drainage holes


Step 7:   Here's where I added the bottom slats, and I didn't nail them into the cleats, just placed them on top.  Then I drilled four drainage holes.  I made the first hole with bit #1 and it didn't work well at all as you can see.  The PT wood was still wet and that might have been it.  I switched to bit #2 and it worked much better.

**********************************

All three built!


Step 8: Staining


Step 8:  I stained them with an exterior fence and deck stain.  I may put a second coat on them if they lighten more as they dry.  I just stained them this morning.

Step 9:  My next step will be lining the planter with black plastic to keep the wet soil from the pine.  Maybe it will last a little longer that way.  Then I'll poke holes in the plastic where I drilled holes.

**********************************

My total cost was $88.84 and most of that was the casters.  If I had to buy all the wood I used it would have been about $200.  If I had bought T&G Cedar it would have been about $250.   So I'm happy.

Next week I'll show you what I did with the scraps from this project.

Photobucket

I'm linking to these parties:
Frugal Friday at the Shabby Nest #215
Catch as Catch Can at My Repurposed Life #78
Thrifty Things Friday at The Thrifty Groove #77
Fabulously Creative Friday at Jennifer Rizzo #117
Made U Look at Made in a Day #166
That DIY Party Time at DIY Showoff #238
Be Inspired at Elizabeth and Co. #113

January 23, 2014

My Cat Is Weirder Than Your Cat

All cats are weird, I'm not disputing that. I used to think our cat was weird because he had been wild before coming to us, but I've come to the conclusion that Buddy is just a really weird cat.


Whaaa? You mean me?

Yes you. Just look at yourself slouching in that chair. You look buzzed.

It's the Crispies, man. I need them to relax.

You know I'm not a man, right?


Figure of speech. Where are those Crispies anyway.  This inquisition is making me anxious. I need me some Crispies.

You've had enough. Let's get back to the topic about you being weird.

You're calling me weird? What about Psycho Kitty? Now that chick was seriously weird.

True, but  Psycho Kitty was scary weird, you're funny weird. Well, sometimes you're scary weird. Like the time I was petting you and you suddenly freaked out and grabbed my arm, and now I bear the mark of the beast from my wrist to my elbow.

Oh yeah.  About that, I think that was from Crispies withdrawal.

That was before I had ever bought you any treats. That was when you first started living in the garage and didn't mind the sounds of any of the saws, hammers, or air guns, and then when all was quiet, you flipped out.

Aren't you glad you started buying me Crispies?  See how calm I have become?  I need some now. I need 'em bad.

Forget the Crispies. You had some five minutes ago. Maybe you need a Crispies intervention.


Naooooooww! Not that. Anything but that. Let's not talk about scary weird. You said funny weird, what's that? Say something nice about me.

Something nice, ok, you're really soft right now, and pretty good about keeping down the rodent population.  Lizards too. I wish you wouldn't leave the spare parts in hard to reach places though.

You want to know what is funny weird? How about how you walk on the edge of the deck when you walk beside me, and then fall off the edge of the deck because there's not enough room?  Why not just walk on the other side of me where there's more room?

Would you believe I'm trying to protect you? No? Well, it might be a control thing, so you go where I want you to go.

Why is it that every time you walk up to me and I bend over to pet you, you suddenly tip over and fall flat on your side?

You make me weak in the knees? I dunno, I like it when you have to bend down farther to pet me.

What about when you're sitting in the chair, like now, and start chasing your tail and then fall off the chair?

I thought it was a mouse. It's a huge disadvantage being the same color as mice you know.

Mice are brown.

You mean I'm colorblind? See how hard my life is? I need some Crispies now.

Why do you drink out of the toilet when there is filtered water in your bowl?

What can I say? It's a cat thing. Besides, that blub blub sound and the bubbles inside the waterer make me nervous. Crispies would help that. How about an Auto Crispies Feeder? Then I wouldn't need you at all. That would make it easier on you. 

You sometimes eat, or even drink, upside down.

Another cat thing. Let's move on. You know, none of this is all that weird. Is that all you've got on me?

One last thing. Why do you roll in ant beds?


Can I plead the fifth? ... ... Interview is over, no one needs to know about my private life. ... ... I'm outta here. ... ... Open the door. ... ... Open the door now. ... ... I'm sitting with my back to you. ... ... No, don't talk to me, I can't hear you. La la la la mi mi mi mi ow ow ow ow... I can't hear you. ... ... Open the door.

The public deserves to hear about this. After all, it does prove that you are the weirdest.

While walking through the yard, Buddy will sniff at the ground and either walk off or start pawing at it. If he paws at it, there is usually an ant bed there. After he has them sufficiently agitated, he plops down into the ant bed, rolls back and forth, then gets up and strolls off. Soon, he is twitching, jumping, scratching, and biting himself. I'd like to help him, but I'd end up with the mark of the beast on both arms if I touched him when he is like this.

As soon as he stops twitching, he will walk back over to the ant bed, stick his paw in it, and if the ants cover his paw quickly, he will do it all over again.  Or he might go off in search of another ant bed.

He didn't just do this once.  He does it nearly every day.  He has a bizarre, masochistic, fascination with ants.

I've only seen him stir up a fire ant bed once. That looked painful.  He yowled in addition to all the twitching, biting and scratching when he was jumping around the yard that time. Most of the time he finds smaller ants, seeming to prefer the crazy ants. Crazy ants, crazy cat. Go figure.

So what do you have to say for yourself Buddy?


I can't hear you. .. ... Open the door.

Want some Crispies? Milk flavor?


Those are my favorite!  I love the milk puff Crispies. I love being inside when it's cold outside.

And me? Do you love me?


Scratch more to the right and I'll think about it.

January 20, 2014

Bucket Head

No, I'm not calling anyone names, though at times I do feel like a bucket head myself.  This is a different kind of Bucket Head, a wet dry vacuum. I saw it at Home Depot on Saturday while I was waiting on Hubby and thought it was pretty neat. They had it hooked up to a sander or something. Then, today, after using the miter saw on a little craft project (I'll show that later this week) and clearing the mound of saw dust around it, I thought that little thing might be just the ticket. We've got a dust collector but it isn't convenient to use with the miter saw and nothing else has worked with it either. So when I needed some materials to finish another project, I bought this too. When I got home, Hubby cut a hole in my workbench for the hose and power cord, and I placed it inside the workbench.


The jury is still out whether this will keep sawdust from piling up behind the saw. I chopped up a few scraps and it seemed to get most of the sawdust. Then, when I started cutting the trim boards for my project, I forgot to turn it on. Smiley

By the way, I did not receive any compensation for this post, though it would be nice.

Update 1/23/2014: Today I noticed that there wasn't any suction and thought, uh oh, the reviews were right, it quit working. But that wasn't it. The tube was clogged. I thought it might be a big chunk of wood, but it was nothing more than sawdust. It was packed too tightly for me to push it out with a stick and I had to painstakingly pick it out with a claw grabber. But then it worked fine again.

Update 2/1/2014:  Once again the tube clogged.  I have gotten into the habit of pulling the tube out of the miter saw to check for suction before and after each cutting session.  There seems to be a lot of sawdust behind the saw every time I use it, so I decided to do a test to see how much sawdust it is actually pulling in.

After 35 cuts with the vac on.

Then I cleaned up the work area before the next set.

After 35 cuts with the vac off.

So the vac is pulling in over half the sawdust that would normally end up behind the saw.

With the vac off, sawdust lands on the floor.  With the vac on, it stays clean.

So basically, it catches the sawdust that comes directly behind the saw blade. The suction area is limited by the size of the saw connection, and the suction isn't strong enough to catch the dust blowing out to the sides. Still, it has enough suction that little pieces from a cut tend to move toward the vac area instead of falling down to the surface below the saw.


Even though it doesn't catch all the sawdust, it pulls in quite a bit, and keeps the work area cleaner. It also collects the dust that normally spins around to land on me and the floor, and a sawdust free floor is a safer floor. The sawdust that is not caught is easily vacuumed by just pulling the tube out of the saw and the tip of that has a funnel shape that makes it easier to get the dust from crevices. So all in all, I am pleased with it.


Photobucket

January 18, 2014

Rhonda Vincent and The Rage

Last evening, we drove over to Longview to see Rhonda Vincent and The Rage. She sings bluegrass and Hubby is a big fan. Hubby bought tickets early so we had good seats in the fourth row. Lively music and her bubbly personality made for a great show.  I can't say that I'm a big bluegrass fan but I really enjoy her shows.

Hubby planned to take pictures with his cell phone as our cells take better pictures in low light, but at the last minute I grabbed my little point and shoot camera. Good thing too as our cells didn't like shooting into bright light at all and just made white silhouettes of everyone on stage. My point and shoot had a low battery which makes it take poor pictures, but these are better than nothing and Hubby will have a photo of his beloved Rhonda Vincent.


Opening for the band was a local group called The Jordans, a brother and sister duo. The concert was held at Belcher Center at LeTourneau University and  Bryce Jordan is a freshman there.  And quite talented too.  Rhonda Vincent surprised the pair by inviting them onstage to sing and play with them during the last two songs, and encouraged the young man to play his mandolin. Now that's class.


After the show, Hubby bought her new CD.  While we waited in the crowd for her to sign it and get a photo with Hubby, I noticed a trend - it was mostly husbands being photographed with her, with the wives taking the photos! Maybe us wives should get together and stand in line for pictures with all the male band members. Haha! Photobucket

January 16, 2014

How to Keep Your Garage Clean(er)

Since my garage will never be clean, I had to say cleaner instead of clean. But your garage may not double as a workshop like mine, and that would make it much easier to keep clean. I would love to have a garage that has nothing in it but cars. But that's not my reality. My garage has to be able to convert from car space to work space quickly and easily.

This post came about because our garage/shop had gotten so cluttered and covered with sawdust that it was actually dangerous. So in total disgust Saturday, I pulled everything out of one bay of the garage and started cleaning and culling. As I cleaned, some areas were easier than others and I made notes on what worked and what didn't.

This is what worked.

1. Keep as much as possible off the floor.


I built a ledge above the floor to put folding tables and my step stool. It makes sweeping the floor a breeze - as long as no one leans more stuff against it.


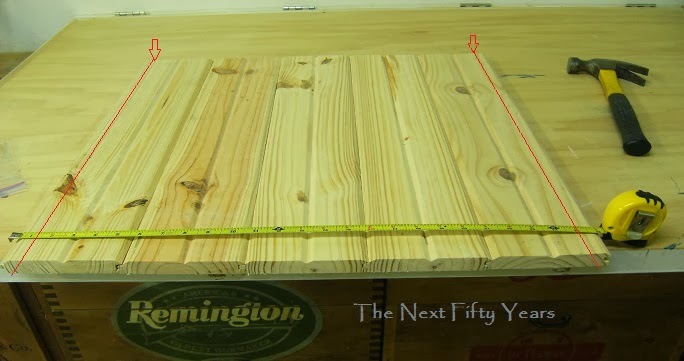
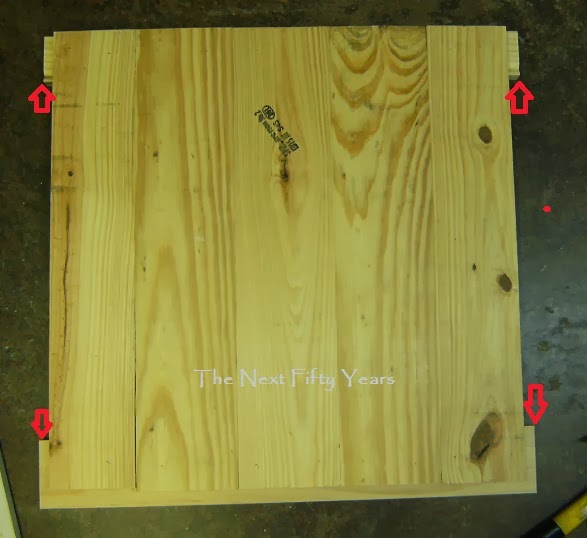
Originally, I just cut some wedges out of 2x4's and screwed them into studs, set a 2x4 on top and screwed it into the wedges, and then put a strip of 1x2 on front to keep doors from sliding off. The tables are also held in by bungee cords attached to hooks in the wall. When I bought another table, I had to rebuild it to make it deeper.

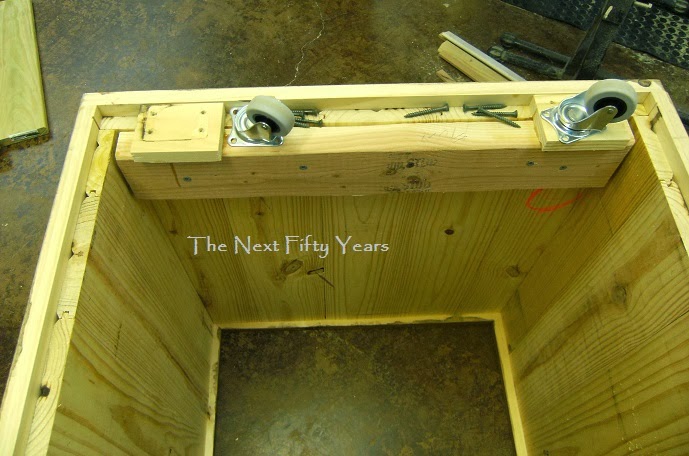
2. Put rollers on cabinets or attach to wall above the floor.


With rollers on cabinets, especially if they hold tools, you can roll them away from the wall to sweep. The cabinet that doubles as kitty steps has wheels on the back and blocks on the front for stability. I found that even with wheel locks, a twenty pound cat hurtling through the air can move a small cabinet, and make an acrobat out of a cat.

I attached shelf brackets to the walls to hold our hardwood scraps. It keeps them off the floor, and keeps them flat. It also helps me sort them by size and type.

3. Hang things on walls. (Antlers and horse shoe optional.)


Each thing hung on the wall is one less thing that has to be picked up and moved to clean behind it. Or, if you are like me, if there is a bunch of stuff on the floor in the corner, it never gets moved.

4. Have a place for everything.


That old adage, a place for everything, and everything in its place, is so true.  I've had small paint supplies in the red chest from the beginning, but the cat steps were just stuffed with, well, stuff.  So I rebuilt the top cabinet to fit (it used to hang over), and put long pegboard hooks in it for paint brushes and can openers.  I just happened to have an extra cabinet door for it too.  Cool.

Today I built the cabinet on the right out of leftover v-groove board from the ceiling project.  It still needs a shelf, but it will hold all the caulking, caulking guns, paint rollers, spackling.  I'd like to have doors for everything so it's out of sight, but that may never happen either.

5. Have the right cleanup tools and keep them handy.

(See the photo with #3.)

A wide shop broom works better on a garage floor than a kitchen broom, though a kitchen broom is better for corners and crevices.  With the amount of sawdust we produce, an oversized dust pan works best too.  We also have a garbage can for take out trash and one for wood scraps so the pieces don't end up underfoot.


***

Got paint?


Once everything was out of the garage and sorted, I found that we had an inordinate amount of wood scraps, odd size screws, and paint.  Waaay too much paint.  I tossed a lot of wood scraps that had been in buckets on the floor for over a year and only kept what would fit on the shelves.  What started as two buckets for small scraps had turned into a pile of wood on the floor, making it hard to get to the wood in the shelves and impossible to find anything in the pile.

Then I called the neighbors and told them that the next time they wanted to try out a paint color or in need of a piece of wood, to browse my garage first and I'm going to call them before buying another can of trial paint.  That shelf of paint is two and three deep, and there is still a stack in the I-don't-know-what-to-do-with-this pile. 

***

In case you are wondering what I found that didn't work, it's stuff for future projects.  There are a couple of tables in pieces, chairs, a headboard, and an old counter top.  These things are not only in the way, there isn't a place for them.  As much as it pains me, I'm not going to buy another project piece unless I am ready to begin working on it.

Photobucket

Linking to The Shabby Nest: Frugal Friday