December 29, 2017

When Buddy Ain't Happy, Ain't Nobody Happy, Err, Make That Warm

We spent some time in the attic this afternoon. I was looking for my quilting UFOs, and Hubby was doing whatever he does up there. It was cold. We had on our coats and I thought of putting on gloves, but I couldn't separate fabric scraps with gloves on. And of course, wherever we are, Buddy T. Cat follows. He was cold too, and went from one of us to the other complaining. Whenever one of us walked toward the stairs, he raced in front of us and was half-way down the stairs before he realized we weren't coming down. Finally, I noticed that Buddy wasn't underfoot complaining, and looked over where Hubby was working. Hubby had hooked up his Mr. Buddy heater and placed it in front of an impromptu cat bed (a cushion with an old towel over it) to keep Buddy warm and happy.


Linking to:
Feline Friday at Comedy Plus

December 28, 2017

2018 Goals

Some of these are duplicates of my sewing room goals, but I'm listing here too because they don't involve actual sewing.

1. Organize my sewing space. I cannot work in disorder, and proved it to myself this month when I tried to make a quilt in a short time. And failed. Even though this is my number one priority, it is also going to be the hardest, so will not likely be the first thing completed. I know I need to put together some shelves, possibly even build some. (See, there is a good reason to be both a woodworker and quilter!)

2. Build something for the house every week until the cabinets and organizers are done.

3. Take a scroll saw class.

4. Exercise 15-30 minutes a day.

5. Cut out sugar and find 15 good autoimmune recipes by the end of January.

6. Stick to an autoimmune diet.

7. On days that are over 50 degrees, work on landscaping 15-30 minutes.

8. Join a book club.

December 27, 2017

Wordless Wednesday at Fort Parker State Park


Linking to:
Wordless Wednesday
Outdoor Wednesday at A Southern Daydreamer
Wordless Wednesday at Comedy Plus
Wordless Wednesday at image-in-ing
Weekend Reflections

Wildflower Wednesday Too

Like the song says, baby it's cold outside! At almost noon now, the temperature is up to 38, but the wind chill is 28.

And yet, there are bluebonnets blooming here and there in the hay field. These are spring flowers so they must know something Old Man Winter does not. I wonder if they will bloom again in the spring?

Lupinus texensis


Lupinus texensis


Liatris usually blooms in fall, but this one decided to wait until winter. Maybe the last mowing altered its growing schedule.

Liatris punctata


This buckthorn was near our campsite at Caprock Canyons State Park in Briscoe County, Texas. I know, it's not a wildflower, or even a bloom. But I thought it was interesting. I wouldn't want it in my field, but it fits perfectly on the caprock.

Ziziphus obtusifolia


And last is another not quite bloom. I don't know what it is either. If you have any idea, let me know. It was also at Caprock Canyons State Park and I was intrigued. So delicate in a harsh environment.


Linking to:
Wildflower Wednesday Roundup at clay and limestone
Wordless Wednesday at image-in-ing

December 08, 2017

Small Town Autoimmune Paleo, Is it Possible?

I love living in this small town, I really do. I have never lived anywhere with such friendly people, especially a small town. But shopping in a small town can be limited, especially a specialized diet like Paleo. I spent October getting off caffeine, and worked on collecting recipes in November. I would say I collected Everyday or Practical Paleo recipes, but I have looked through those recipes and they aren't quite practical enough or everyday enough for me. Maybe I should write a book called Small Town Paleo. lol The problem is that most paleo recipes try, in some way, to replicate favorite known recipes using hard to find and fairly expensive ingredients.

This is my local grocery store. Produce and meat on the right, dairy at the back.


And this is the rest of the store, all eight aisles of it.


There is no almond flour, no coconut flour (not that I would use it), no coconut aminos, no soup bones or bones with marrow of any kind, no organic anything, very limited vegetables, and, well, you get the picture. They do have natural almond milk, and coconut milk. I buy the almond milk but I still can't stand the smell of coconut, much less the taste. I don't know if that is something one can get over or not but I'm going to try. I can't drive into the city to get to a Whole Foods even if I could afford to shop there. I can go to neighboring towns, all about twenty miles away, but their selection isn't a whole lot better. And I certainly can't drive to one of those towns for a spur of the moment grocery run. I need to have shelf stable staples on hand, and cook with ordinary food, more along the line of foods that early man really did eat.

I also take exception to the term paleo, and think of it more as the Noah diet. But I won't go into that. Someone named it Paleo and the name stuck. So that's that.

I am going to spend the rest of December compiling recipes until I have a few breakfast recipes, a few quick lunch options, some premade single meals, and at least 14 dinner meal recipes. Because I know myself, and if I don't have an easy option when I walk in the door at 5:30, I'll revert back to my old habits and eat a sandwich or open a can of soup. Both of those are easily available at the local market, along with an entire aisle of soda and chips.

Healthy is hard, and Christmas is harder, but getting used to the recipes now and cutting back on my sugar will make it easier in January than just going cold turkey on bread, dairy and sweets plus trying to come up with an edible recipe every day.

If you have a favorite paleo recipe, that is also accepted on the autoimmune protocol, please share it with me. Did I mention that Hubby, who is going to continue eating anything he wants, will also need to like these recipes?

My favorites so far are:
Breakfast:
Chicken and Apple Sausage - Guest post at Paleomg. I shred the apples and don't precook them. Also, beware, there are a lot of popups at this website.
Turkey Hash - This was a suggestion from a friend. Cooked and crumbled ground turkey with a little seasoning. Because that is a little dry, after frying the turkey, I deglaze the pan with chicken broth, and then thicken with arrowroot powder and a little almond milk.

Dinner:
Roast Chicken in the instant pot using salt, pepper, garlic salt, dried oregano, and basil.
One Pan Balsamic Chicken Veggie Bake from The Real Food Dietitians
Everyday Paleo Salisbury Steak from Sarah Fragoso - Everyday Paleo

December 04, 2017

Even in a Small Town


When I pulled into the parking lot at the local grocery store, I saw this little car. Only it wasn't a car, it was a bicycle. I walked over to the man driving it and he told me he had just gotten it and was driving from Dallas to Austin. He had stopped over it to charge it and get some sleep. It's an ELF from Organic Transit. It's really cute, but pricey. I never thought I'd see one in our little town.

December 01, 2017

Organizing the New Garage

After months of working on the house end of the barndominium with our tools in boxes, the workbench, and *gasp* on the floor, I began organizing the garage side. I first had to have Hubby's help hanging plywood on the walls. In our metal building, the vertical posts are fifteen feet apart, and the horizontal girders are four feet apart. So we needed something to hang stuff on. We put two rows of plywood bolted to the iron, and bolted a 2x4 to the girder eight feet off the floor. Just the right height for a two foot platform that can hold several hundred pounds, and three shelves above that for lighter items.


I have begun building the lower cabinets as we decide where we want things.  So far, a regular height cabinet and a lower one for the miter saw/scroll saw.  Above those cabinets, I hung a cleat across the wall.  That gives us the flexibility to move things around until we have them in the most convenient place.  Point of use is my mantra in this workshop.  Hopefully, that will save some steps when it is finished.

If you haven't seen a cleat system used for tools, it is simply a board cut in two with a 45° angle.  One half of the board is nailed to the wall and the other half is used on tool caddies.  The two wedged pieces fit together snugly but it is still easy to remove the tool caddy when needed.  If it's a long board, the other half can be used on quite a few caddies.  I made some of the cleats out of hardwood and some out of plywood.  I made all the cleats and caddies out of scrap wood.


I made clamp holders, ear protection muff holders, measuring tape holders, jig holders, and more.  One thing I saw on pinterest that I thought looked pretty neat was a tape roll dispenser, so I made a few.   I even made slots on each side to make it easier to lift them off the cleat.


They look nice, but weren't very practical.  A full roll of tape fills the dispenser nicely, but a roll that is close to the end sits low in the dispense and the tape has be pulled upward which sometimes made it pop out of the dispenser even though I curved the dowel slot to try to prevent that.  They take up extra space on the wall, they are a little fiddly to make, and sometimes we just want to grab a roll and not mess with a dispenser.  But more than anything, when they are on the cleat, it's hard to see which roll of tape is in the dispenser.  So after working on them over the course of several hours, I marked them a fail.


What worked better for us was to make a box that would hold all sizes of tape and have them visible no matter what size they are.

After staring at the underside of the platform one day, I decided to make use of that space too.  In this one I put caulk guns and caulking.  That odd stuff that doesn't sit well on shelves and tangles in drawers works well in a drop down drawer.  I put hinges on the back and some simple wood pieces that turn to let the drawer down.


The next thing I want to do is put a rail on the front of the platform and attach a ladder to it that will tuck in when not in use.

November 06, 2017

Quick Update

The time seems to be flying by these days. In September, we decided to buy a bigger trailer. We were looking at bumper hitch trailers and then found this garage kept fifth wheel trailer. We didn't intend to buy it, we just wanted to see what it was like. Hubby could stand upright in the shower, so after a week of discussion and comparison shopping, we decided to buy it. Then, after another month of shopping, we sold our F150 and bought a Chevy 2500 to pull it.

The change in trailers has been life altering. 


August 02, 2017

Making a Small Camper Workspace

I think the hardest thing about living in a small space is the lack of countertop. In our trailer, which wasn't meant to be lived in full time, there is exactly seven inches of kitchen counter space. If I'm not cooking on the stove top, I can use that space, but bottles won't stay upright on the grate, and particles of food fall through the grate and onto the burners. But trying to prep food while I'm cooking on the stove is a real pain. So I decided to make a removeable top to extend the counter space when I am cooking or prepping. It is out of the way against the wall when I need the whole sink.

Before:


After:


That light spot on the counter is a reflection of the light above it.

I made is using a pieced board from Home Depot similar to this one. The one I got had final thickness of 5/8". I also had to cut it down on the table saw so it's final size is 19"x48". Then I wanted to try out a tinted Watco Danish oil on it so I bought a can of cherry tint. On pine, it was kind of an orangey-red, but so is the trailer, so that's okay. I like Watco oil because it penetrates the wood and I think that helps with water resistance. I won't be using this as a cutting board, so being food-safe didn't matter.

It has not only made cooking in the trailer easier, but it is also a good place to put the Instant Pot which I use a lot to keep from heating up the trailer.

July 25, 2017

Internet Again, At Last!

No more hotspotting, so I hope to be online again more. I say I hope because I've gotten out of the habit of being able to be online at leisure. I still feel a little guilty for using gigs when I've been on for more than ten minutes. Then I have to remind myself that I have unlimited data now. I don't have unlimited time, those pesky chores still have to be done, but in just a few hours today, I'm already slacking off on them and spending too much time online.

The other day, while driving down the highway, we watched a storm moving in. It was like the old soap opera, The Edge of Night, if you remember that one. I snapped this between swipes of the wiper blades.

May 30, 2017

Outdoor Sink Table

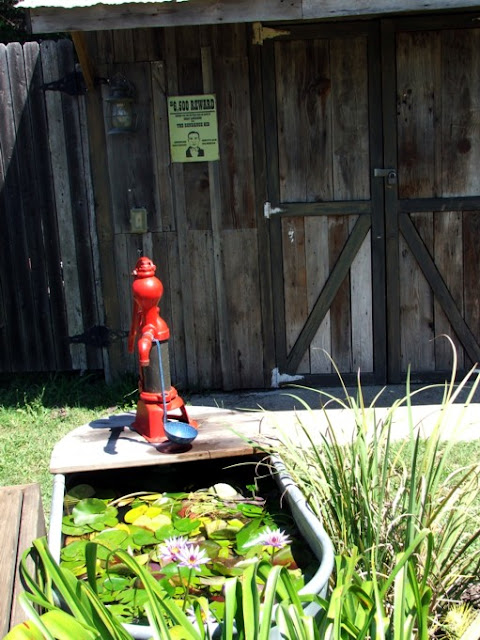
This is my finished table, and it turned out just the way I wanted it, with a galvanized tub sink and a hand pump.  At least it finally turned out just the way I wanted it.


When I first thought of this idea, I planned on doing a tutorial, but then I found that someone (or several someones) not only had the idea before me (Rats!), but had already done tutorials.  So I won't waste your time with another one.

Crafty Staci has one on how to put the drain in the tub.

Click on picture for tutorial. (Photo used with permission by Crafty Staci.)

 Be sure to read all the comments for more detail.  I used a 17 inch round tub where she used a 22 inch oval tub and because of that, I had to use a smaller strainer.  I found a 3 inch bar sink strainer at Lowes.  The larger kitchen sink strainer overlapped the rounded ribs of the tub and would have been difficult to seal.  I got the tub at Tractor Supply but I noticed that Home Depot also has a similar tub.

There are also hundreds of tutorials on building the sink table. I found one similar to the one I made at Ryobi Tools but it was really an Ana White plan. The differences between hers and mine is that I didn't make a tall back (a 2x4 just fit the gap after the last deck board and made a nice backsplash) and didn't put the bracing on the back. I built my back just like the front.  And I had to add two support boards (identical to the side aprons but 2x2 instead of 2x4) on either side of the sink. I also made mine wider (it's 48 inches) and it is about an inch deeper.

Click on picture for tutorial.  (Photo used with permission from Ana White.)

So while I won't waste your time with another tutorial, what I will do for those who might want to make one of these someday is to show you some of my oops moments so you can avoid making them.

1.  Drilling the hole in the tub.  That is the scary part, and for good reason.  When I bought the strainer and told the plumbing department man what I was going to do, he said I needed a 1-3/4 inch hole saw for metal.  Not true.  After Hubby made the second hole with me holding the tub to keep it from spinning with the drill, I attempted to insert the strainer and found that it was about a quarter inch too small so I had to use a metal file to enlarge the hole.  What's a hole saw, you ask? This.  It fits on a drill.


Staci said her husband put a piece of wood and pounded on the center of the tub to make an area for the drain.  We did that also, not necessarily to make an area for the drain, but to make sure the bottom of the tub was solidly on that surface to drill into.  You can see that the bottom of the tub has a rim that holds it up about a quarter of an inch.


With my first attempt, I didn't do that, and after the bit cut through the final metal, it bounced, spun the tub, and made a jagged cut.  Rats again!


2.  Draining the sink.  Notice in Staci's picture that her tub has a flat bottom.  Mine has round, corrugated ridges, and those ridges keep the water from completely draining from the tub.  What I wish I had done was to pound the entire bottom of the tub so it had a concave shape.  If it really bugs me, I might try to go back and do that.  I put some suds in the sink so you can see how much doesn't drain completely.


3.  Drain pipe or not?  The man in the plumbing department also told me I needed a drain pipe attached to the strainer or the water would splatter into my bucket.  But that isn't true the way I built the table.  I use a five gallon bucket which just fits under the sink.  If I had a drain pipe, I wouldn't be able to get the bucket under the sink at all.

4.  Attaching the tub.  When I was trying to design this table, I thought I would just put the tub on a shelf under the counter.  But when I began building, I could see that that would make the table way too heavy and it would actually be in the way.  So I took a cue from my kitchen sink and attached straps to the 2x2s on either side of the sink.  Somewhere around here is some metal strapping, but it's probably packed in box under twenty other boxes, so I had to improvise.  I used the plastic strapping that held our lumber delivery together.  In this picture, I just have one strap on.  When finished, I had two straps, crossed under the sink.  When I find the metal strapping, I will change it out.


5.  Plan ahead.  Goes without saying, right?  Well I had this bright idea to hide my screws with wood plugs.  After I had the plugs glued in, I realized that we haven't found the sander yet.  Packed in one of those piles of boxes still in storage probably.  So, someday, when I find the sander, I'll sand off all those plugs.

I called this an outdoor sink table in my title, and someday it will be outside.  For now, it's beside my travel trailer to give me a big tub for washing dishes.  If you have ever washed a casserole dish in a tiny travel trailer sink, you know why I wanted a bigger sink.  I am not using the hand pump right now, but later, when the sink is outside, I'll put a bucket of water under it so kids can pump water.  This is a cistern pump that was handed down to us from Hubby's parents.  My kids loved pumping water when they were little and I hope it can be enjoyed again here.  You may remember it being in my galvanized tank pond at our last house.


May 23, 2017

In Case You Were Wondering, I'm Still Here

The building is progressing slowly. Very slowly. We have just about finished framing in the barn, and are living out here in our trailer. Not ideal, and I have had a meltdown, but we'll make it. Hubby started building the stairs to the attic last night so I won't have to risk life and limb climbing the ladder in order to get up here to use the computer. Once we get real internet instead of this hotspot, I hope to start posting again regularly.

Several weeks ago I decided it was time to move the galvanized stock tank pond down to the barn.  It was stuck off in the trees to keep it out of the way while they were building the barn, and I want it in place before they start backfilling around the barn.

After I got it in place and leveled, or as level as a slightly bowed metal tank can get, I decided to climb inside it to clean it before adding water.  That was easy, but when climbing out, I must have forgotten that I'm not as young as I used to be, and couldn't quite lift my left leg high enough to clear the rim.  My foot hung on the rim but the rest of me kept going over and I hit my right side on top of the rim before hitting the ground.  At first I thought I had broken ribs, but looks like I just cracked one or two.

Needless to say, I haven't been lifting too much unless I absolutely had to.  I'm almost 100% again and will try to remember my age in future projects.