
Your walls are freshly painted, your trim is gleaming with new enamel, and there are your ugly, paint spotted, flesh-colored electrical outlets. You don't have to live with them, replace them!
I have friends who are amazed that I have replaced my electrical outlets. They think it's too hard, or it takes an electrician. Not so. This is for them, and for anyone else who has ever wanted to replace an outlet. After your first one, you'll be able to replace an outlet in fifteen minutes at a cost of 49¢ plus tax.
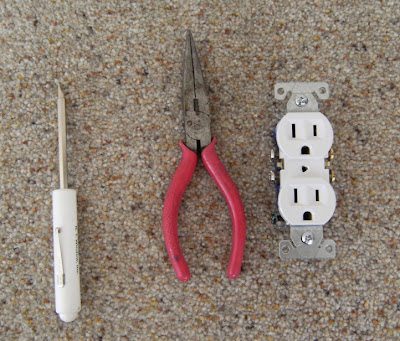
You need a new standard outlet, a narrow screwdriver, a phillips-head screwdriver, and a pair of needle-nosed pliers. My screwdriver is a combination slot-head and phillips-head.
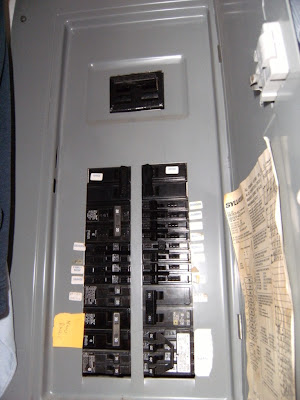
Step 1. Turn off the electricity to the outlet you want to change. This is something you will only forget one time.*grin* I plug in a radio and turn it up so I can hear it from the circuit breaker box. When the music goes off, I know I've got the right breaker. This is also a good time to label that breaker if you haven't already.
Step 2. Take off the outlet cover which is held on by a little screw in the center.
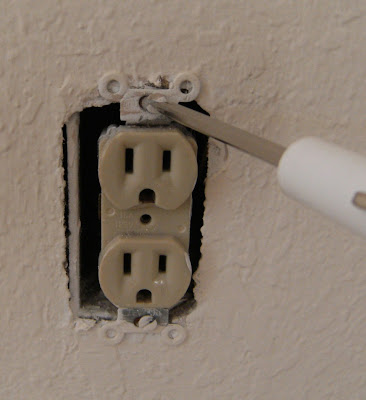
Step 3. Take out the screws at top and bottom holding the outlet into the box.
Step 4. Grab it and pull gently until it won't come any further. It's okay to grab it, that's why you turned off the electricity.

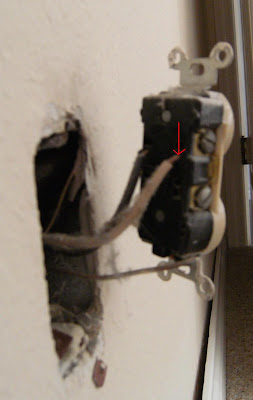
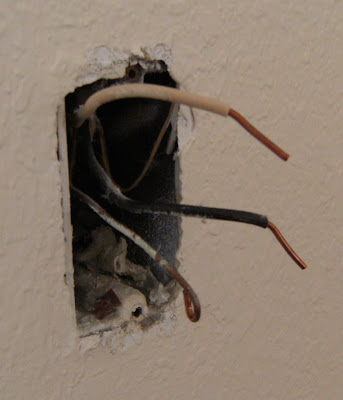
Step 5. There should be three wires in the box, two coated ones (a black one and a white one) and one copper one. If there are more wires, two white and two black, mark the top black wire and the top white wire with something like adhesive tape. Once the wires are disconnected from the outlet, you'll either forget which was on top or they'll move, so marking now will save aggravation later. The outlets with four wires are just a bit harder to do because the extra wires make is less flexible. The copper wire will be wrapped around a screw at the bottom. Are the coated ones wrapped around the screws on the side like this?

Or are they poked into holes in the back like this one?
Step 6. If they are wrapped around the screws on the sides, it's easy, just loosen the screws with a screwdriver until you can get them off. Repeat with the copper wire on the bottom. If the wire doesn't lift off the screws, you can take the screw completely out.

You can take off the copper wire first or last, it doesn't matter. If they are poked into holes in the back, it is probably easier to work with the plug if that wire has already been released.
If the coated wires are poked into the holes in the back, it takes a little more effort. Put the blade of your narrow slot-head screwdriver into the slot above the wires. Pull on the wire while pushing hard on the slot until the clamp releases and the wire pulls out. If it doesn't release, wiggle the screwdriver until you find the release.

After releasing the wires from the back and removing the outlet, your wires will look like this:
If the coated wires were on the sides, they will be curled like the copper wire. If so, skip down to step 8. If they were in the back, continue with the next step.
Step 7. With your needle-nosed pliers, grab the end of one of the coated wires

and curl it like the copper wire - like this

Repeat with all the straight ended wires. You could replace the wires by poking them into the round holes at the back, but wrapping them around the side screws is the safer method recommended by electricians because it won't accidently release.
Step 8. Work the curled wire end onto the top screw of the new outlet, white on left and black on right, taped wires on top screws, untaped ones on bottom screws. Then take off the adhesive tape; you don't need it any longer. (Put it on as pictured below with the curl going clockwise, the same direction you will be tightening the screw. If the curl goes counterclockwise, you could loosen it when you tighten the screw.) Make sure the coating has been removed so the copper part wraps the screw. This usually isn't a problem with a replacement. With the needle-nosed pliers, grab the curled wire end like this and tighten it until it is snug against the screw. If you only have one wire on each side, tighten down the bottom screw also, even though there is no wire on it.
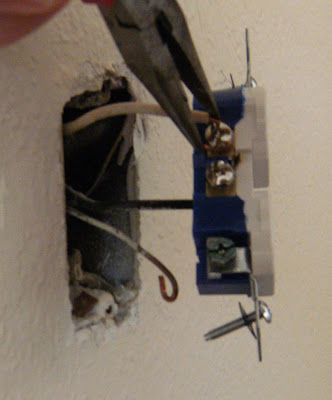
Make sure the copper wire is against the metal plate of the new outlet, and not held up by the plastic housing on the sides.

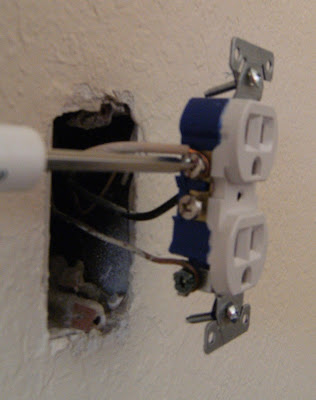
Step 9. With screwdriver, tighten the screws down firmly.
Step 10. While the new outlet is still hanging out from the wall, plug in your radio and go flip on the breaker. If all is well, turn the breaker back off. This may seem like an unnecessary step, but it will save time if you don't have the wires on right and have to redo anything. You don't want to wrestle it back out of the box. You can put a short strip of electrical tape across the screws as a safety precaution to prevent shock if you should ever forget and pull the outlet out of the box without turning off the breaker. The tape will also remind you to turn off the breaker before touching the screws.
Step 11. Push the outlet into the box. You may have to bend the wires a little to get them started. Then, a little pressure and it is in place. The outlets with four wires require a little more effort because the wires never want to bend back in as they were before. A little rocking motion helps. Screw the new outlet into the electrical box at top and bottom.
If your new outlet isn't straight, those screws are in a wide slot. Loosen the screws and adjust the outlet so it is straight.

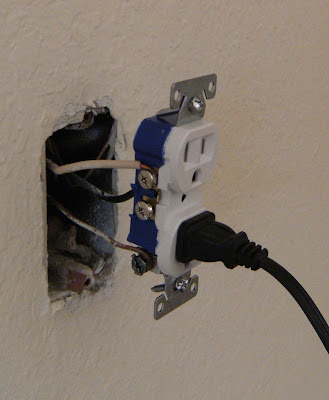
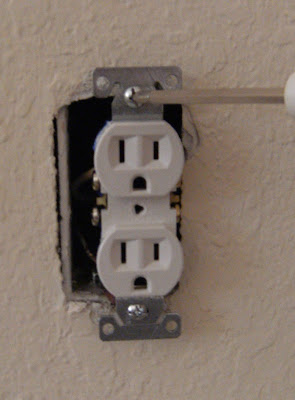
Step 12. Replace the outlet cover. Make sure the outlet is flush with the cover.

If the outlet protrudes out of the cover, remove the cover and tighten the outlet down more. If the outlet sinks in, unscrew the outlet a little. If that causes it to move when you plug something in, remove the outlet and use the little round paper washers from the old outlet to give it a solid backing.
Voila! You've replaced an electrical outlet.

Until next time, may you have blessings and your own toolbox,
Marti
This entry has the Hubby Seal of Approval!
I have friends who are amazed that I have replaced my electrical outlets. They think it's too hard, or it takes an electrician. Not so. This is for them, and for anyone else who has ever wanted to replace an outlet. After your first one, you'll be able to replace an outlet in fifteen minutes at a cost of 49¢ plus tax.
You need a new standard outlet, a narrow screwdriver, a phillips-head screwdriver, and a pair of needle-nosed pliers. My screwdriver is a combination slot-head and phillips-head.

Step 1. Turn off the electricity to the outlet you want to change. This is something you will only forget one time.*grin* I plug in a radio and turn it up so I can hear it from the circuit breaker box. When the music goes off, I know I've got the right breaker. This is also a good time to label that breaker if you haven't already.

Step 2. Take off the outlet cover which is held on by a little screw in the center.
Step 3. Take out the screws at top and bottom holding the outlet into the box.

Step 4. Grab it and pull gently until it won't come any further. It's okay to grab it, that's why you turned off the electricity.

Step 5. There should be three wires in the box, two coated ones (a black one and a white one) and one copper one. If there are more wires, two white and two black, mark the top black wire and the top white wire with something like adhesive tape. Once the wires are disconnected from the outlet, you'll either forget which was on top or they'll move, so marking now will save aggravation later. The outlets with four wires are just a bit harder to do because the extra wires make is less flexible. The copper wire will be wrapped around a screw at the bottom. Are the coated ones wrapped around the screws on the side like this?

Or are they poked into holes in the back like this one?

Step 6. If they are wrapped around the screws on the sides, it's easy, just loosen the screws with a screwdriver until you can get them off. Repeat with the copper wire on the bottom. If the wire doesn't lift off the screws, you can take the screw completely out.

You can take off the copper wire first or last, it doesn't matter. If they are poked into holes in the back, it is probably easier to work with the plug if that wire has already been released.
If the coated wires are poked into the holes in the back, it takes a little more effort. Put the blade of your narrow slot-head screwdriver into the slot above the wires. Pull on the wire while pushing hard on the slot until the clamp releases and the wire pulls out. If it doesn't release, wiggle the screwdriver until you find the release.

After releasing the wires from the back and removing the outlet, your wires will look like this:

If the coated wires were on the sides, they will be curled like the copper wire. If so, skip down to step 8. If they were in the back, continue with the next step.
Step 7. With your needle-nosed pliers, grab the end of one of the coated wires

and curl it like the copper wire - like this

Repeat with all the straight ended wires. You could replace the wires by poking them into the round holes at the back, but wrapping them around the side screws is the safer method recommended by electricians because it won't accidently release.
Step 8. Work the curled wire end onto the top screw of the new outlet, white on left and black on right, taped wires on top screws, untaped ones on bottom screws. Then take off the adhesive tape; you don't need it any longer. (Put it on as pictured below with the curl going clockwise, the same direction you will be tightening the screw. If the curl goes counterclockwise, you could loosen it when you tighten the screw.) Make sure the coating has been removed so the copper part wraps the screw. This usually isn't a problem with a replacement. With the needle-nosed pliers, grab the curled wire end like this and tighten it until it is snug against the screw. If you only have one wire on each side, tighten down the bottom screw also, even though there is no wire on it.

Make sure the copper wire is against the metal plate of the new outlet, and not held up by the plastic housing on the sides.

Step 9. With screwdriver, tighten the screws down firmly.

Step 10. While the new outlet is still hanging out from the wall, plug in your radio and go flip on the breaker. If all is well, turn the breaker back off. This may seem like an unnecessary step, but it will save time if you don't have the wires on right and have to redo anything. You don't want to wrestle it back out of the box. You can put a short strip of electrical tape across the screws as a safety precaution to prevent shock if you should ever forget and pull the outlet out of the box without turning off the breaker. The tape will also remind you to turn off the breaker before touching the screws.

Step 11. Push the outlet into the box. You may have to bend the wires a little to get them started. Then, a little pressure and it is in place. The outlets with four wires require a little more effort because the wires never want to bend back in as they were before. A little rocking motion helps. Screw the new outlet into the electrical box at top and bottom.

If your new outlet isn't straight, those screws are in a wide slot. Loosen the screws and adjust the outlet so it is straight.

Step 12. Replace the outlet cover. Make sure the outlet is flush with the cover.

If the outlet protrudes out of the cover, remove the cover and tighten the outlet down more. If the outlet sinks in, unscrew the outlet a little. If that causes it to move when you plug something in, remove the outlet and use the little round paper washers from the old outlet to give it a solid backing.
Voila! You've replaced an electrical outlet.

Until next time, may you have blessings and your own toolbox,
Marti
This entry has the Hubby Seal of Approval!
What happens if I skip step 4?
ReplyDeleteI kid. I kid...;)
~Karen
Is this procedure about the same for changing out the light switches...or adding dimmer switches? Ask your husband, please!
ReplyDeleteYes, you just have to be sure you put the wires in exactly the same. Three way switches have more wires also. Did you know there are light switches with lights in them so you can find them in the dark? That's what we put in the girls' rooms when they were young. There is an orange glow in the switch.
ReplyDeleteROFLOL ! My oldest was reading over my shoulder - and said "Mom, that lady fixed something without DUCT TAPE ! In our house - that's unheard of ! You've given me some inspiration - since today I'm taking apart our oven and hoping like anything Sears will have the part I need to replace .... before Thanksgiving !
ReplyDeleteCan electrical tape remain wrapped around the outlet screws when replaced into the box or does this create a fire hazard?
ReplyDeleteYes, the electrical tape isn't wrapped around the screws really. It's just a strip on top of the screw heads, to prevent the wires touching anything except the plug posts.
Delete