If you have a young child, you will love this picture book. Pepe the Key West Rooster, written by Victoria Scudder and illustrated by Nita Candra. I'm way older, and I loved this book! I was given an Advanced Reader Copy, ARC, but it was my idea to review it here for you.
As you can tell from the title, Pepe is a rooster who lives in Key West, Florida. He is just a young rooster though, a cockrell, and wants to be like his handsome and popular father. But he feels small and drab compared to his father. He doesn't know what his special qualities could be that will set him apart from other roosters. He goes on a quest, seeking out his friends to see if they know what talent he could learn to make him special. From them, he learns patience, self-acceptance, and that he is already unique.
Pepe's trip around the island is full of famous places that made ME want to visit there. His conversations with friends are touching and encouraging. As a parent and now a grandparent, this is exactly the kind of book I want my grands to hear. Without giving anything away, let me just say that you will love the ending. This is a perfectly written rhyming book. If you've ever written a poem, in school or afterward, you know how difficult it is to find words that have both the right meaning and that rhyme. Some rhyming books sound a bit disjointed because of that. But not this one. The meter is measured yet conversational and the sentences and words used are completely balanced.
The illustrations are simple, bright, and colorful, just like life on the island. Some of the famous landmarks are visited too. If you've been there, you will recognize them in the illustrations. At the end of the book is a kid-friendly history lesson with a paragraph about each landmark visited by Pepe.
It's on Amazon Unlimited, so you can read it before buying it for your children or grandchildren. If yours are like my grandsons, they want to hold the book and flip through it over and over before I ever start reading.
Enjoy!

Marti's DIY and Life in General
August 05, 2023
June 14, 2023


June 09, 2023
The Murderer Wore Obsession Cologne
(Prompt word this week is BOX.)
Her white cane sweeping the sidewalk in front of her, Lisa walked to her door and let herself in, glad to be done with a long, trying day.
She had been translating for a French national, suspected of the murders of twenty young women, before being extradited that evening.
His nauseating cologne had become stronger and stronger as they sweated him in the interrogation room and the cloying odor seemed to follow her home.
Lisa kicked off her shoes and placed them neatly beside the door before padding across the oak floor toward the kitchen, stopped by an unfamiliar box blocking the door.
She reached into the box and felt a roll of duct tape on top of loose plastic, and then a hand on her shoulder as he said: "Enfin seul, Lisa, Alone at last."

Linking to: Six Sentence Story at GirlieOnTheEdge>
April 06, 2023
Thankful Thursday


Neighbors who watch out for each other.
Spring rains.
Hummingbirds and purple martins.
And since Easter is just days away, I can't end without saying that I am thankful for Jesus, who gave his earthly life so we might have eternal life.
Leeanna's prompt this week is ""do you have any fun or special memories of getting or giving an easter basket? What was in it? Was it covered in that shiny see through crinkly paper and candy sitting on that paper grass? Remember that wall of easter baskets in the front window of the dime stores ? Did you do easter egg hunts in the yard, and did you love it? "
When I was a little girl, it was usually too cold to have Easter egg hunts outside. The day before Easter, we drew on boiled eggs with our crayons and then dyed the eggs in rainbow colors. The dye wouldn't penetrate the crayon wax so the words and designs showed up after dying. One big splurge my mother made at Easter was to buy an Easter egg dye kit. There were tablets of concentrated dyes and little metal egg holders that looked like a lasso with a bend beside the loop. It was quite a contest to see who could carefully cradle the egg in the loop of this little metal lasso and dip the egg in the dye without it falling off.
On Easter morning, we got up to find that the eggs were hidden all over the house, and when I say hidden, I mean hidden. None were in plain sight. After all the eggs were gathered, we gave them to Mom in exchange for a live chick or duckling that we got to keep in our room until it was big enough to go outside. Cheep, cheep, cheep all night long! I didn't know Mom counted the eggs in our baskets until the year one was missing. It was finally found a couple of weeks later in my closet and boy did it smell bad! After our egg hunt, I put on my best dress and went to church. If I had grown much since Christmas, Mom would have made a new dress in spring colors. Lunch was probably a ham, but I only remember that the Easter eggs were now deviled eggs which we quickly devoured.
After we moved to North Texas where the grass is green and flowers are in bloom at Easter, our girls had Easter egg hunts in our yard and garden. We usually had their hunts after church when it was a little warmer and we didn't have to worry about being late for church. It was so fun to see them running from flower to flower looking for eggs, which were plastic, not boiled, and filled with candy or nickels.
 |
| Easter 1999, Mom with my girls. |
*******
Mia and Smokey Chime In
Smokey: Why is Mia's name first? I lived here first. I demand top billing.
Mia: I'm more important than you are and besides, it's alphabetical order. You're already distracted too. We're here to talk about things we are thankful for.
Smokey: Well, I am happy that it is spring and my catio is open all day. I'm happy the mice are in the backyard again.
Me: Wait. What mice?
Smokey: The mice that lived under the steps last year are back again this year. I got one already. *smug grin*
Mia: I showed him where they were hiding, but mousing is cats' work.
Smokey: What is dog's work? You lay in bed all day.
Mia: Chasing stray cats out of the yard. Remember that black cat that was harassing you Saturday?
Smokey: Yeah, he growled at me while I was in my catio.
Mia: After mama shooed him away from your catio, he went into my backyard, and I chased him up one side and down the other and he finally squeezed through a cattle panel to get out. He won't be back to bother you anymore.
Smokey: You did that for me? I love you.
Mia: Ewww, don't say that, I don't even like you. Protecting you is just part of the job.
Smokey: I'm going to come rub on you anyway.
Mia: Not looking at you. You're not there. Go away.
Me: What are you thankful for Mia?
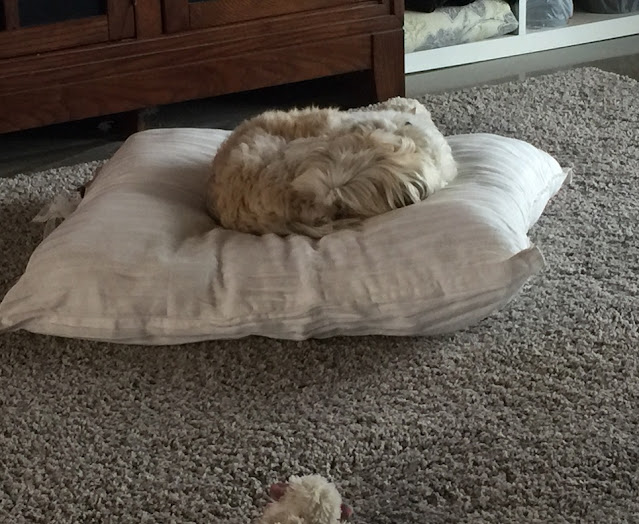
Mia: I love dad.... and my pillow... and my bed in the kitchen... and my bed in the ham shack... and my bed in the RV. And cheese. I love cheese.

Me: What about me? Do you love me?
Mia: Eh? You're ok. I love that you feed me chicken.
*******
I am linking with the usual Thankful Thursday linkups, and I'm sad to see that Overflowing with Thankfulness is discontinuing her linkup after today. We'll miss it Jennifer but understand how a weekly obligation can be tiring. Jennifer has a Wednesday linkup called Currently that looks interesting and I hope to join it next week.
I Like Thursday at Not Afraid of Color
Thankful Thursday at It's a Small Town Life

I Like Thursday at Not Afraid of Color
Thankful Thursday at It's a Small Town Life
February 15, 2023
Thankful Thursday
I don't have a lot of Thankfuls this week. I can't believe it's already been a week since I wrote my last post. For the last several days, I've been noticing signs of spring. I first noticed that the Callery Pear trees at Home Depot were in full bloom. You may know them as Bradford Pear or pyrus calleryana. They're a trash tree from Asia and have made the Texas Invasive Species List. But they do have an impressive display of white blooms every spring. So starting my list is:
1. I love spring! I haven't seen any wildflowers in bloom yet, but the dandelions have bloomed and gone to seed. I even like dandelions because the honey bees love them, and because they attract aphids which keeps the aphids out of my garden. I've heard dandelion wine is good, but I've never tried it. During the depression, people used to eat all parts of the dandelions, from the roots to the blooms. Thanks to the dandelions in bloom, I've also seen my first butterfly of the year, a sulfur, flitting from one yellow blossom to the next. I've also seen the first grasshopper of the year and the first mosquito. I'm not thankful for them though.
1. I love spring! I haven't seen any wildflowers in bloom yet, but the dandelions have bloomed and gone to seed. I even like dandelions because the honey bees love them, and because they attract aphids which keeps the aphids out of my garden. I've heard dandelion wine is good, but I've never tried it. During the depression, people used to eat all parts of the dandelions, from the roots to the blooms. Thanks to the dandelions in bloom, I've also seen my first butterfly of the year, a sulfur, flitting from one yellow blossom to the next. I've also seen the first grasshopper of the year and the first mosquito. I'm not thankful for them though.
 |
| Free photo from Pixabay |
2. I like my town. I am so glad we moved here and wish it had been sooner. The other day I had to mail something, so I grabbed it and headed to the post office where I picked up a padded envelope, carefully stuffed my project in it, and walked up to the counter where I realized I had forgotten the address. I started to take my project out (it wasn't a free envelope), but the postmaster waved me off and told me to take it home, put the address on it and pay for it when I brought it back. Small town trust!
3. I like my Sketchers. I noticed this week that they are starting to come apart at the seams and it makes me sad that I won't have them much longer, but they have given me 4 or 5 good years and maybe the next pair will too.
4. I'm adding this hours after posting this, but Hubby came in this morning and said the purple martins have come home! It took awhile for all four of them to be out at the same time, but he took a few pictures for me. Whoohoo! Spring is definitely on the way. These may only be scouts, but they seem to have claimed a couple of nesting boxes, so we'll see.
How did you know, what did they do or say that made you look again, this time knowing they were your person?"
I feel incredibly lucky to have several friendships that have lasted over 60 years. I think they have lasted so long because we have so much in common, but also because of trust. Without trust, I don't think any relationship will last. Let me tell you about two times that I knew someone was going to be in my life forever.
First was the boy I had known since I was 13. We went to the same church but not the same junior high so I only saw him a couple of times a week. We went to the same high school but we weren't in any classes together and dating different people, so didn't see each other much. But at the end of our senior year, we went out as friends, and we had a nice time. Thanks to years of frienship, there wasn't any first date awkwardness and then we started seeing each other more often. I think I started falling in love with him the day he came over to fix something on my car that he had noticed was broken. We both dated other people too, but it really wasn't until someone else asked me to marry him that I realized I only wanted to marry my best friend. A year later, we did get married and after 47 years, I'd rather spend the day with him than anyone else I know.
Second is a woman named Ruthie who I met on my first day at a new job. She sat at the desk in front of me and from that first day, it was like we had known each other forever. We weren't allowed to have personal conversations at work except during breaks, so we developed a kind of conversation shorthand where sentences went unfinished because we knew what the other was going to say, so it was a series of sentence fragments. It was an odd workplace, with co-workers who barely spoke to each other all day. But somehow, Ruthie and I communicated with nods and goofy facial expressions. We'd wave goodbye after work and then call each other as soon as we got home to have real conversations and laugh that we thought the same things about all the silent communication at the office. On weekends, we helped each other with home projects or went shopping. We moved away first and our conversations and visits became less frequent until they gradually stopped. Then, a few years ago, I googled her name, called her, and it was like no time at all had passed. She had also moved and now had cystic fibrosis. We began talking every day again, but as time went by, it was harder for her to talk very long and once again, we spoke in sentence fragments and still understood each other perfectly. I miss Ruthie but I know if we could talk today, we'd take up right where we left off.
I'm joining the usual Thursday linkups:
Thankful Thursday
I like Thursday
Thankful Thursday
3. I like my Sketchers. I noticed this week that they are starting to come apart at the seams and it makes me sad that I won't have them much longer, but they have given me 4 or 5 good years and maybe the next pair will too.
4. I'm adding this hours after posting this, but Hubby came in this morning and said the purple martins have come home! It took awhile for all four of them to be out at the same time, but he took a few pictures for me. Whoohoo! Spring is definitely on the way. These may only be scouts, but they seem to have claimed a couple of nesting boxes, so we'll see.
♥ ♥ ♥ ♥ ♥ ♥ ♥ ♥
This week, Leeanna's prompt is: "Tell us about a time you knew someone was for you... in honor of Love month, I'm thinking a mate but it can be a best friend, or your dog/cat, etc.How did you know, what did they do or say that made you look again, this time knowing they were your person?"
I feel incredibly lucky to have several friendships that have lasted over 60 years. I think they have lasted so long because we have so much in common, but also because of trust. Without trust, I don't think any relationship will last. Let me tell you about two times that I knew someone was going to be in my life forever.
First was the boy I had known since I was 13. We went to the same church but not the same junior high so I only saw him a couple of times a week. We went to the same high school but we weren't in any classes together and dating different people, so didn't see each other much. But at the end of our senior year, we went out as friends, and we had a nice time. Thanks to years of frienship, there wasn't any first date awkwardness and then we started seeing each other more often. I think I started falling in love with him the day he came over to fix something on my car that he had noticed was broken. We both dated other people too, but it really wasn't until someone else asked me to marry him that I realized I only wanted to marry my best friend. A year later, we did get married and after 47 years, I'd rather spend the day with him than anyone else I know.
Second is a woman named Ruthie who I met on my first day at a new job. She sat at the desk in front of me and from that first day, it was like we had known each other forever. We weren't allowed to have personal conversations at work except during breaks, so we developed a kind of conversation shorthand where sentences went unfinished because we knew what the other was going to say, so it was a series of sentence fragments. It was an odd workplace, with co-workers who barely spoke to each other all day. But somehow, Ruthie and I communicated with nods and goofy facial expressions. We'd wave goodbye after work and then call each other as soon as we got home to have real conversations and laugh that we thought the same things about all the silent communication at the office. On weekends, we helped each other with home projects or went shopping. We moved away first and our conversations and visits became less frequent until they gradually stopped. Then, a few years ago, I googled her name, called her, and it was like no time at all had passed. She had also moved and now had cystic fibrosis. We began talking every day again, but as time went by, it was harder for her to talk very long and once again, we spoke in sentence fragments and still understood each other perfectly. I miss Ruthie but I know if we could talk today, we'd take up right where we left off.
I'm joining the usual Thursday linkups:
Thankful Thursday
I like Thursday
Thankful Thursday
Subscribe to:
Posts (Atom)